I had been wanting to make these for a very long time. Really very long time. But although inspiration was there....motivation was lacking. But with my new found enthusiasm for craftiness, I seized the opportunity to make these fabric flower headbands for a couple of very special little girls I know.
I have used an old denim here. But these will look pretty in any fabric.
Here is how it goes.
You need:
1. Fabric of your choice.
2. Scissors.
3. Matching thread and needle / hot glue gun. (I don't own a glue gun, so went with needle thread)
The How To:
1. Start with tracing out circles on your fabric. You will need 4-5 circles per flower. Remember the size of the circle is the size of the flower you will get. So choose your template wisely. I used an empty reel of cello-tape.
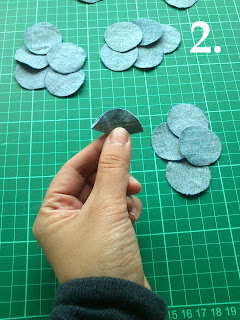
2. Take one circle and fold in half (image 2). And again, fold in half to get a quarter circle. Repeat with other circles (image 3).
2. Take one circle and fold in half (image 2). And again, fold in half to get a quarter circle. Repeat with other circles (image 3).
3. Repeat for another 4 circles. So you have 5 quarters with you.
4. Stitch together 4 quarters to make a circular base (image 4). Now you CAN stop here, and finish of your flower with a cute button or embellishments in the centre. Hot glued or stitched. Or, you can proceed to step 5.


5. Add the last quarter in the centre for a more fuller looking flower.
And you are done !!!! Flower 1 ready....
Now repeat. Repeat. Repeat. And then repeat some more. These come together so quickly, its darn addictive.
And you are done !!!! Flower 1 ready....
Now repeat. Repeat. Repeat. And then repeat some more. These come together so quickly, its darn addictive.
I decided to stitch them on to some elastic headbands. And then Put them in brown paper-stapled-together bags. Each bag then got a neat tag made of salt dough (i love that stuff btw).
Stitch them on headbands. Or glue them to hair clips. Or to pins to use as brooches...the options are limited only by your imagination.
Now, lets go and decorate some pretty heads!!


No comments:
Post a Comment